Beginner Pineapple Painting

Friday Fun

We are going to paint a couple of pineapples but we are not going to stress or worry about rules. Let’s get started and have some fun.

Supplies:
acrylic paint - cheap
paint brushes
canvas or acrylic paper - canvas might work better, tape tears paper
tape

Tape the entire canvas or acrylic paper. Make sure to over lap the tape’s edges
Draw out the shape of a pineapple, it can be a simple oval
Carefully cutout the pineapple shapes
Paint the pineapple area that is not covered by tape. It can be any colors you want. I chose blues like the ocean for one and warm colors like a sunset for the other pineapple. Let the paint dry completely.
Tape crisscross pattern on the pineapples

pineapple-painting1.jpg

Paint white on exposed areas, this is so the other colors show up better. Let dry completely
Paint pineapple colors, yellows, browns and greens. I used a sponge so it would have texture. Let dry completely.

pineapple-painting2.jpg

Remove the tape carefully, if using the acrylic paper be very careful the tape does tear the paper.
Add the pineapple top, painting the stems green and yellows.

pineapple-painting3.jpg

Congratulations you are done and have some really cool art.

Thanks for stopping by, see you next time.
Remember to like and follow for more fun art lessons

Animation Background Painting Made Easy

Friday Fun

Today will be a little different from the usual Friday Fun but we are still going to have some fun. We are going to replicate an animation background painting from a Chuck Jones cartoon. I love cartoons from this era, they had such fun backgrounds and the music was great. Just not the same with today’s cartoons. Before we get started let’s take a quick look at Chuck Jones.

Chuck Jones:
An American animator, director, cartoon artist, screenwriter, and producer. His career spanning over 60 years, Jones made more than 300 animated films, winning three Oscars as director and in 1996 an honorary Oscar for Lifetime Achievement.

Supplies:
acrylic paint (phthalo blue, purple, orange, lemon yellow, black, and white)
canvas or heavy duty painting paper
brushes

animation-background-painting1.jpg

Ok let’s get started. Get your supplies ready and let’s go…

Start with painting the back ground first. Using phthalo blue, purple and a little white paint the entire canvas and let it dry.

animation-background-painting2.jpg

Add stars and moon. Flick the white paint to simulate stars in the sky. Paint the moon with white and lemon yellow and let dry.

animation-background-painting3.jpg

Draw the houses and T.V. antennas and then paint them black. Let this dry and then paint white for the windows. (we do this so color will be bright and show up when we are painting over another color)

animation-background-painting-all3.jpg

Finish the the windows with orange and yellow. There you go you now have your own animation background painting.

animation-background-painting7.jpg

Thanks for stopping by, see you next time. Remember to follow and like for more art lessons like this one.


Easy Blind Contour Drawing

Friday Fun

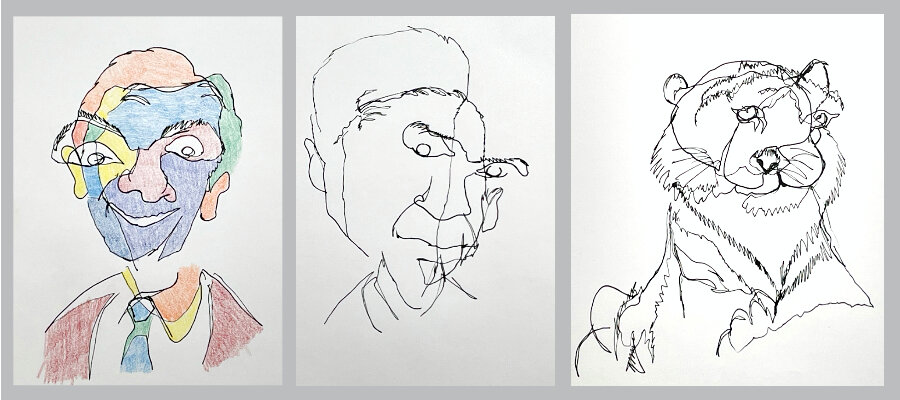
Thanks for coming by we have a fun one for today. We are going to do some blind contour drawing.

Blind Contour: a line drawing without looking at the paper and keeping the pencil on the paper the whole time.

The point of the blind contour is not to have a pretty drawing but to focus on what you are seeing. It helps to build eye hand coordination and can be silly so you loosen up and have some fun. Remember it’s Friday Fun so don’t worry about the outcome just enjoy the creative process. Here are some things we need before we get started.

Supplies:
pencil (make sure its dark enough) or pen
paper
timmer
*colored pencils or paint (this is optional)

Preparation:
Find a subject to draw. This can be anything you want, just have it ready.
Tape done the paper so it does not move when drawing.

Rules:
Set a timer for 5 - 10 minutes
Do not look at the paper only on the subject (what you are drawing)
Once the pencil touches the paper you cannot remove it until you are done.

Ok let’s get started. Try a few to see how different each one can be. You can even color your drawing when done.

FF-blind-contour-drawing.jpg

Like and leave a comment and remember to follow for more art lessons and tips.

Thanks for stopping by, see you next time.


Pointillism Pet Portrait

Friday Fun

Yay it’s Friday and we have another fun project for today. This week our inspiration is from Pointillism.
~Remember to follow us for more great art tutorials.~

Pointillism: was the application of paint in carefully placed dots of pure, unmixed color. (Points of pure color) These dots would be blended by the viewer’s eye to create a striking image. Pointillism was a radical painting technique explored by Georges Seurat and Paul Signac in Paris in the mid-1880s.

Let’s jump in and have some fun.

Supplies:
pencil & eraser
small canvas or canvas paper
cheap acrylic paints & paint brushes
Colors can be anything you want.

Draw out your pet portrait, if you don’t have a pet you can use free domain references found on the internet. Have fun with it, don’t worry about the little details you wont see them in the final painting. Remember we are being inspired by Georges Seurat.

Start with the background. Don’t complete it just get a good amount of the background covered with color. I like to pick the main color for an area to start with.

pointillism-pet-portait1.jpg

Start working on the pet area when a good amount of coverage is on the background. Working the whole painting at the same time so you can see how the colors look together. This time I started with the light areas so I could map them out and keep them light.

Add middle value colors in pet area. Again I am picking the main color to start filling in the area of the pet.

pointillism-pet-portrait2.jpg

Go bold with your colors, this will really start to bring your painting to life.

Add the darks to complete your painting.

pointillism-pet-portrait3.jpg

Congratulations you have completed a Seurat pointillism inspired painting.
If you have enjoyed this tutorial please click the like button and leave a comment below.

Thank you for stopping by and see you next time.


Easy Cardboard Roll Monsters

Friday Fun

Yes it’s Friday and we have another fun project for you to try at home. We are going to make cardboard roll monsters. Remember we are not looking for perfection but creativity so let’s have some fun.

roll-monsters1.jpg

Supplies:
cardboard rolls (can be empty paper towel rolls cut in half or empty bathroom tissue rolls)
extra piece of cardboard (to cut out arms and horns)
acrylic paint (any cheap paint will do)
paint brushes


Paint the cardboard rolls any color that you like for your monsters body. You may need to paint more than one coat of paint, let it dry in between coats.

roll-monsters2.jpg
 

Draw and paint the extra parts like arms or horns. It can be anything you want to add to your monster. Make sure they are fully dry before you cut them out and glue them on the body of your monster.

roll-monsters4.jpg
 

Paint on the face, make it any kind of face you want. You can have one eye or add as many as you want. Make sure each part dries before you paint the next to keep the paint from smudging.

roll-monsters5.jpg

Congratulations on your little monsters.
Thanks for stopping by and creating along with me.
See you next time.


Paper Owl Fun

Friday Fun

Today we will make a cutout paper owl for Friday fun. Remember to keep it simple and have fun. You can use construction paper if you have it otherwise find some thick paper you can paint with basic acrylic paint.

Supplies Needed:
construction paper (heavy card stock if painting)
scissors
pencil (to draw your owl shapes)
glue (multi-purpose works best)
paint (if not using colored construction paper)


Start with drawing out the shapes you are going to use for the owl. Circles for the eyes, ovals for the head and body, triangle for the beak. You get the idea. There are no wrong ideas you can make your owl look anyway you want it to.

FF-cut-paper-owl.jpg
 

Cut out the shapes of the owl. Don’t start glueing just yet, you want to make sure all the pieces will fit together first. Once all the pieces are cut fit them to together to see if you need to make any changes or cut new pieces.

FF-cut-paper-owl2.jpg
 

Glue the large pieces together and then glue on the smaller pieces. Just like when you draw, large shapes first and work your way down to smaller shapes.

FF-cut-paper-owl3.jpg
 

Wow great job! Enjoy your new paper owl.

 
FF-cut-paper-owl4.jpg