Beginner Pineapple Painting

Friday Fun

We are going to paint a couple of pineapples but we are not going to stress or worry about rules. Let’s get started and have some fun.

Supplies:
acrylic paint - cheap
paint brushes
canvas or acrylic paper - canvas might work better, tape tears paper
tape

Tape the entire canvas or acrylic paper. Make sure to over lap the tape’s edges
Draw out the shape of a pineapple, it can be a simple oval
Carefully cutout the pineapple shapes
Paint the pineapple area that is not covered by tape. It can be any colors you want. I chose blues like the ocean for one and warm colors like a sunset for the other pineapple. Let the paint dry completely.
Tape crisscross pattern on the pineapples

pineapple-painting1.jpg

Paint white on exposed areas, this is so the other colors show up better. Let dry completely
Paint pineapple colors, yellows, browns and greens. I used a sponge so it would have texture. Let dry completely.

pineapple-painting2.jpg

Remove the tape carefully, if using the acrylic paper be very careful the tape does tear the paper.
Add the pineapple top, painting the stems green and yellows.

pineapple-painting3.jpg

Congratulations you are done and have some really cool art.

Thanks for stopping by, see you next time.
Remember to like and follow for more fun art lessons

Shape Basics: Characters From Shapes

Tutorial Tuesday

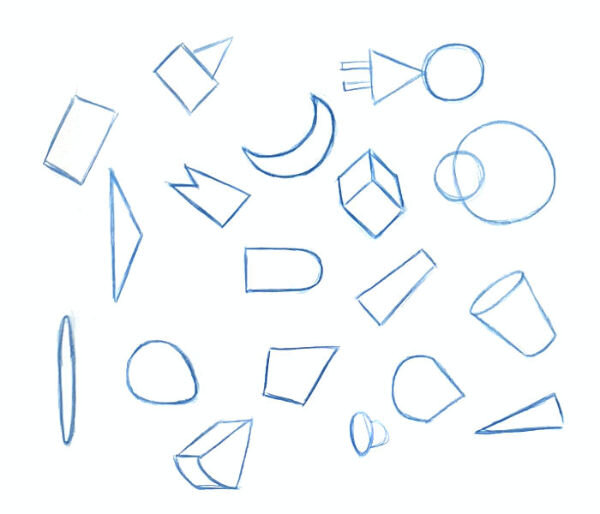
When creating characters try to work out the overall shape first. Explore different shapes and don’t be afraid to differ from the norm or what you are used to seeing. Have fun and doodle. Let’s get started with sketching some shapes.

Sketch out some basic shape ideas.

shape-basics-language4.jpg

Add character details to the shapes.

shape-basics-language1.jpg

Clean-up the sketch and you are left with a fun character.

shape-basics-languge2.jpg

Thanks for stopping by, see you next time. Remember to like and follow me for more art tutorials.


What's Your Motivation Style?

Monday Motivation

Here are some common motivation styles that drive people to work hard and achieve success.

Money and Rewards: We all want to get all the shiny new stuff. The stuff isn’t really important but maybe its the feeling of getting the new stuff that is driving you.

Desire to be the Best, Win: Think of world record athletes, to be the best of the best they dig hard and sacrifice a lot. There can only be one at the top.

Helping Others: For some it’s changing the lives of the people around them and making a difference. Maybe you have been there and know the feeling so helping others motivates you to keep going.

Power and Fame: Politicians and business men want to become powerful leaders.They are driven to achieve greater power and fame in life.

Recognition: To prove that either they are right or someone is wrong. Sometimes it’s just to getting recognition from others.

Passion: Think about it, there are times when you feel so passionate for something that you are willing to sacrifice for it.

You can be driven by more than one motivation style but there will always be a dominant style. Find out which style motivates you the most. Create a plan to drive your success with that style of motivation.

motivation-style1.jpg

Thanks for stopping by, see you again next time.
Remember to like and follow for more great art tutorials.


Animation Background Painting Made Easy

Friday Fun

Today will be a little different from the usual Friday Fun but we are still going to have some fun. We are going to replicate an animation background painting from a Chuck Jones cartoon. I love cartoons from this era, they had such fun backgrounds and the music was great. Just not the same with today’s cartoons. Before we get started let’s take a quick look at Chuck Jones.

Chuck Jones:
An American animator, director, cartoon artist, screenwriter, and producer. His career spanning over 60 years, Jones made more than 300 animated films, winning three Oscars as director and in 1996 an honorary Oscar for Lifetime Achievement.

Supplies:
acrylic paint (phthalo blue, purple, orange, lemon yellow, black, and white)
canvas or heavy duty painting paper
brushes

animation-background-painting1.jpg

Ok let’s get started. Get your supplies ready and let’s go…

Start with painting the back ground first. Using phthalo blue, purple and a little white paint the entire canvas and let it dry.

animation-background-painting2.jpg

Add stars and moon. Flick the white paint to simulate stars in the sky. Paint the moon with white and lemon yellow and let dry.

animation-background-painting3.jpg

Draw the houses and T.V. antennas and then paint them black. Let this dry and then paint white for the windows. (we do this so color will be bright and show up when we are painting over another color)

animation-background-painting-all3.jpg

Finish the the windows with orange and yellow. There you go you now have your own animation background painting.

animation-background-painting7.jpg

Thanks for stopping by, see you next time. Remember to follow and like for more art lessons like this one.


Hand Design: Masculine vs. Feminine vs. Baby

Tutorial Tuesday

Hello and welcome to today’s tutorial, hands. These are some of the things I think about when I’m designing hands for a character.

Over all hand shape and proportions.

hand-proportions1.jpg
 

What type of wrist connects to the hand.

hand-proportions2.jpg
 

What are the length and shape of the fingers.

hand-proportions3.jpg

These are just some suggestions and not rules. Try it out and see what you can come up with.

Thanks for stopping by and see you next time. Remember to like and leave a comment.


See Your Skills Improve

Monday Motivation

Feel like your drawing is a failure? It’s ok to feel you’re not where you want to be in your art career, but don’t dwell on it. Work towards your goals and practice your skills with intent. If you just had a bad drawing take out one of your older drawings and take a look at it. I like to keep a drawing or painting of a time I thought was successful and then go back and look at it again a year later and compare it to what I’m doing today. Wow such a difference in my approach and what I thought was successful. I try to do this every year so I can really see the improvement and it keeps me going.

Thanks for stopping by and see you next time. remember to leave a comment and like our page.

MM-see-your-improvement.jpg
 

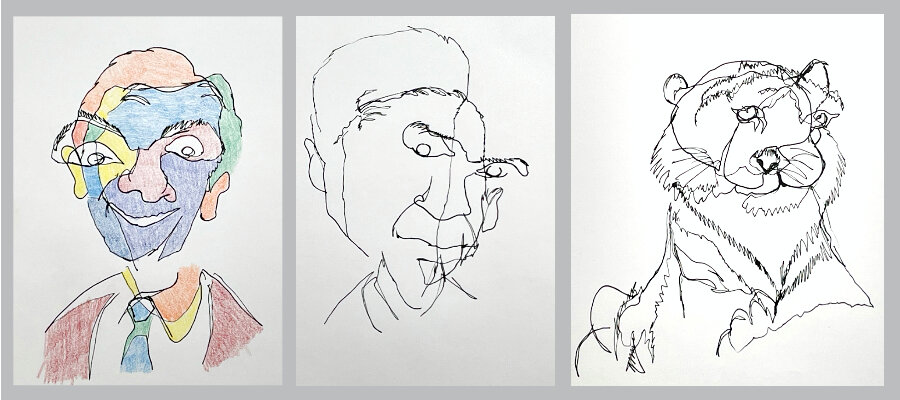
Easy Blind Contour Drawing

Friday Fun

Thanks for coming by we have a fun one for today. We are going to do some blind contour drawing.

Blind Contour: a line drawing without looking at the paper and keeping the pencil on the paper the whole time.

The point of the blind contour is not to have a pretty drawing but to focus on what you are seeing. It helps to build eye hand coordination and can be silly so you loosen up and have some fun. Remember it’s Friday Fun so don’t worry about the outcome just enjoy the creative process. Here are some things we need before we get started.

Supplies:
pencil (make sure its dark enough) or pen
paper
timmer
*colored pencils or paint (this is optional)

Preparation:
Find a subject to draw. This can be anything you want, just have it ready.
Tape done the paper so it does not move when drawing.

Rules:
Set a timer for 5 - 10 minutes
Do not look at the paper only on the subject (what you are drawing)
Once the pencil touches the paper you cannot remove it until you are done.

Ok let’s get started. Try a few to see how different each one can be. You can even color your drawing when done.

FF-blind-contour-drawing.jpg

Like and leave a comment and remember to follow for more art lessons and tips.

Thanks for stopping by, see you next time.


Value Basics for Beginners

Tutorial Tuesday

Let’s get started with some basics for values.

Value: how light or dark something is.

Value Is used in drawing and painting to depict light and shadow. These values define form giving the illusion of depth and space.
Value has the ability to define: Mood, atmosphere, composition, and the believability of the image. If your values are inaccurate your drawing or painting falls apart. If you have correct values in your drawing/painting you can use any color you want and it will look correct.

It’s a good idea to practice a value scale, white to black scale with each step filled with grey getting darker the closer to black the square is.

Try it out: make a row of 1 inch squares, 5 to 10 squares long, keep the first square white and the last square black. Each square should be darker grey as they get closer to the black square. Try to keep a consistent change in value between each square.

value-basics1.jpg

Another practice is to create another value scale but this time smooth transitions from light to dark.
Try it out: make another value scale next to your previous value scale and start with the dark side and work you way back to white.

value-basics2.jpg

After you done a these scales try a small drawing using value only. As you are drawing have the values scales you have completed next to you so you can refer to them as you draw.

value-basics3.jpg

Thanks for stopping by and see you next time. Remember to click the like button and leave a comment below.


Find Your Morning Spark

Monday Motivation

Hello everyone and thanks for stopping by, remember to click the like button and leave a comment below.

Find something you like, it can be anything to get you up and going in the morning. We all have something that gets us excited and happy to start our day. For some its going on a bike ride, sketching or listen to your favorite song. The point is to start your day with a positive thought and feeling. When ever we have something we are excited about we tend to wake up feeling better and ready.

So look for your morning spark, could be just one anything simple and try to have different kind of morning spark every other day or 2 to 3 different kinds in a week. Find the time to do it every day even just for a little bit, so you can feel satisfied that you started your day with something you love and enjoy. This should help make you feel good and keep you going with your routine the rest of the day.

find-your-spark.jpg

Thanks for stopping by and see you next time.

Pointillism Pet Portrait

Friday Fun

Yay it’s Friday and we have another fun project for today. This week our inspiration is from Pointillism.
~Remember to follow us for more great art tutorials.~

Pointillism: was the application of paint in carefully placed dots of pure, unmixed color. (Points of pure color) These dots would be blended by the viewer’s eye to create a striking image. Pointillism was a radical painting technique explored by Georges Seurat and Paul Signac in Paris in the mid-1880s.

Let’s jump in and have some fun.

Supplies:
pencil & eraser
small canvas or canvas paper
cheap acrylic paints & paint brushes
Colors can be anything you want.

Draw out your pet portrait, if you don’t have a pet you can use free domain references found on the internet. Have fun with it, don’t worry about the little details you wont see them in the final painting. Remember we are being inspired by Georges Seurat.

Start with the background. Don’t complete it just get a good amount of the background covered with color. I like to pick the main color for an area to start with.

pointillism-pet-portait1.jpg

Start working on the pet area when a good amount of coverage is on the background. Working the whole painting at the same time so you can see how the colors look together. This time I started with the light areas so I could map them out and keep them light.

Add middle value colors in pet area. Again I am picking the main color to start filling in the area of the pet.

pointillism-pet-portrait2.jpg

Go bold with your colors, this will really start to bring your painting to life.

Add the darks to complete your painting.

pointillism-pet-portrait3.jpg

Congratulations you have completed a Seurat pointillism inspired painting.
If you have enjoyed this tutorial please click the like button and leave a comment below.

Thank you for stopping by and see you next time.


Great Beginner Watercolor Paints

Thrifty Thursday

Watercolor painting can be fun and expensive but there are affordable options out there. Let’s take a look at the different watercolor paint types.

Watercolor paints can be liquid or solid, tubes (liquid) or pans (solid). There are a variety of colors and they vary depending on the brand. You can buy a set of colors or select individual colors that fit your needs.

watercolor-paints2.jpg

An affordable way to go is with a pan set that has the necessary colors for you to get started. Another option is to get a few select colors to start with. If just starting out I would suggest getting a set so you don’t have to worry about selecting colors.

Once you are comfortable with watercolors and have decided you like painting move onto getting individual tubes so you can set up your color palette the way you like it.

Some inexpensive pan sets you can find: Prang, MeiLiang, or Winsor & Newton Cotman Water Colour (pocket) watercolor sets.  For the least expensive watercolor tube paints Winsor & Newton Cotman are a good start.

This is not a sponsored blog these are just some of the products that I personally use. You can always explore and find other options.

great-beginner-watercolor-paints.jpg

Thanks for stopping by, see you next time.

*This is not a sponsored blog these are just some of the products that I personally use. You can always explore and find other options.


Keep Perspective in Mind

Tutorial Tuesday

When sketching out your idea always try to keep perspective in mind so your elements line up or are placed in the sketch properly. This helps to keep realistic positioning and makes the sketch more believable even if you are cartooning. If you are having trouble seeing the perspective as you draw go ahead and add some grid lines to help you see. You can always remove them later for the final drawing.

keep-perspective-in-mind1.jpg
keep-perspective-in-mind2.jpg
keep-perspective-in-mind3.jpg
 

Easy Cardboard Roll Monsters

Friday Fun

Yes it’s Friday and we have another fun project for you to try at home. We are going to make cardboard roll monsters. Remember we are not looking for perfection but creativity so let’s have some fun.

roll-monsters1.jpg

Supplies:
cardboard rolls (can be empty paper towel rolls cut in half or empty bathroom tissue rolls)
extra piece of cardboard (to cut out arms and horns)
acrylic paint (any cheap paint will do)
paint brushes


Paint the cardboard rolls any color that you like for your monsters body. You may need to paint more than one coat of paint, let it dry in between coats.

roll-monsters2.jpg
 

Draw and paint the extra parts like arms or horns. It can be anything you want to add to your monster. Make sure they are fully dry before you cut them out and glue them on the body of your monster.

roll-monsters4.jpg
 

Paint on the face, make it any kind of face you want. You can have one eye or add as many as you want. Make sure each part dries before you paint the next to keep the paint from smudging.

roll-monsters5.jpg

Congratulations on your little monsters.
Thanks for stopping by and creating along with me.
See you next time.


Learn Primitive Shapes to Draw Anything

Tutorial Tuesday

Shape Basics: Primitive & Primary Shapes

Get to know basic primitive shapes that you can use to build up a drawing. Primitive shapes are a great tool for breaking down complex forms into simplified shapes. It is much easier to visualize the simple shapes and arrange your ideas. Practice drawing shapes from all angles and perspective, squash and stretch them so when it comes time to draw you are already familiar with the shapes.

Start with circles and squares. Squash and stretch them into different sizes and shapes. Play around and have fun with it.

shape-basics-primitive-shapes1.jpg
 

Combine the circles and squares to create more shapes. Don’t be afraid to try different combinations and fill a page of shapes.

shape-basics-primitive-shapes2.jpg
shape-basics-primitive-shapes3.jpg
 

Put the shapes together and draw something. Simple shapes can create fun images and you can combine the shapes to get more complex drawings.

shape-basics-primitive-shapes4.jpg

Go ahead and try this, have fun and doodle. Let’s see what you can come up with.

Thanks for following along, see you next time.


Shape Basics For Beginners: Draw Through

Tutorial Tuesday

Shape Basics: Draw Through

Draw through objects as you draw. When placing an object behind another don’t just draw the parts the viewer would see, this can cause miss alignment and have a weird effect. Drawing through helps you line up and place the objects you are drawing properly.

Add more details using the shape structure lines as guides to add eyes, nose or other details.

Clean up your structure lines by removing the lines you don’t want to see in the final drawing.

There you go well done!

shape-basics-draw-through.jpg