Light Basics for Beginners

Tutorial Tuesday

Direct light when it shines on an object will create a light side and dark side. All forms in direct light will have the same elements. The darkest light element will never be as dark as the lightest dark element. A halftone will never be as dark as reflected light. Keep this in mind when shading.

Light & Shadow elements:
Light side
A. Highlight
B. Halftone
Dark side
C. Core Shadow
D. Reflected Light
E. Cast Shadow

light-basics-directlight1.jpg
light-basics-directlight2.jpg
light-basics-directlight3.jpg

That’s all for today, thanks for following along. Keep practicing!


Beginner Watercolor Whale Silhouette

Friday Fun

Today we are going experiment with watercolor in a fun way with no stress. We are going to make a colorful silhouette of a whale and color it with watercolor. You don’t need to know how to paint we are going to let watercolor do what watercolor does. Gather your supplies and let’s get started.

Supplies:
watercolor paper
watercolor paint (it doesn’t have to be expensive any cheap brand will work)
brushes
something to draw with


Sketch out the shape of the whale below (any animal will work). You can even look up online and find something that works for you.


Ink the line sketch but just the outline, no rendering or inking the inside shapes just he outline like the drawing below. Allow the ink to fully dry before moving to the next step.

FF-beginner-watercolor-whale2.jpg
 

Paint with water only the inside of the animal shape. While it’s still wet pick a color from your watercolor paints and touch inside the animal shape where it is wet. Watch as the watercolor spreads but don’t try and fix it just let it do its thing. Continue with adding colors you like.

FF-beginner-watercolor-whale3.jpg

Wait for the painting to dry and you are finished.
Congratulations you did it.


Thanks for painting along with me, see you next time.


Save Your Money on Paper

Thrift Thursday

Paper cheaper by the ream/bundle

Paper plays an important part of art, whether you are sketching or drawing. Quality paper is important but if you are just sketching or working out ideas, a ream of heavy weight copy paper is a good alternative to buying a sketchbook or art paper. It’s much cheaper per sheet than a sketchbook from an art store and it holds the drawing media just fine. Wet media does not work as well but you could still use markers, ballpoint pens or sharpies.

If you want to keep all of your sketches together or want a handy way to hold all of the paper while you are out and about sketching hole punch the copy paper. Put all of the loose sheets of paper in a cheap binder and you are all set.

cheap-paper2.jpg
cheap-paper1.jpg

Paper Basics:

  • Paper weight - how thick the paper is.
    Heavier weight = thicker paper (example: 20lb. thin paper - 80lb. thick paper)\

  • Paper brightness - how bright the paper is, brighter paper appears whiter.

  • Paper surface - the finish or texture of the paper.
    Hot press = smooth surface
    Cold press = slightly bumpy, textured surface

color pencil on copy paper (two pieces taped together)

color pencil on copy paper (two pieces taped together)

Thanks for stopping by, until next time keep drawing.


Learn Primitive Shapes to Draw Anything

Tutorial Tuesday

Shape Basics: Primitive & Primary Shapes

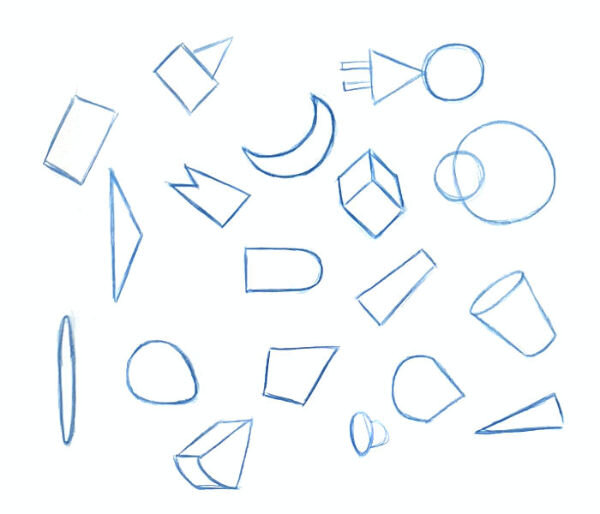
Get to know basic primitive shapes that you can use to build up a drawing. Primitive shapes are a great tool for breaking down complex forms into simplified shapes. It is much easier to visualize the simple shapes and arrange your ideas. Practice drawing shapes from all angles and perspective, squash and stretch them so when it comes time to draw you are already familiar with the shapes.

Start with circles and squares. Squash and stretch them into different sizes and shapes. Play around and have fun with it.

shape-basics-primitive-shapes1.jpg
 

Combine the circles and squares to create more shapes. Don’t be afraid to try different combinations and fill a page of shapes.

shape-basics-primitive-shapes2.jpg
shape-basics-primitive-shapes3.jpg
 

Put the shapes together and draw something. Simple shapes can create fun images and you can combine the shapes to get more complex drawings.

shape-basics-primitive-shapes4.jpg

Go ahead and try this, have fun and doodle. Let’s see what you can come up with.

Thanks for following along, see you next time.


The Magic of Follow Through

Monday Motivation

When I was in art school I had a life drawing class. I was completely intimidated by this class, I had never drawn people before. In the first few weeks we did a lot of quick sketches the gesture and I was getting comfortable drawing people.
In the middle of the semester I noticed I was still having issues with drawing people and I didn’t seem to be improving. I was doing all the quick warm-up sketches and watching the instructors demos but that was all I was doing. I never did follow through with the rest of the drawing process and so had no practical skills just theory from watching the demos. I realized I had to face the hard part of drawing and follow through to the end of the process.
The last part of the semester I made sure to not just do the warm-up sketches and watch the demos but also complete the drawing, mistakes and all. I would love to say that by the end of the semester I had mastered figure drawing but that is unrealistic. I did however really understand the drawing process, learned what I needed to work on and could practice and I did improve much quicker.

Decide what it is you are going to learn. Example: I’m going to learn portraits or hands

Follow through to the end. Example: After I sketch the gesture I will continue with the form and anatomy.

Practice and stick with it until you know it. Example: I’ve drawn 100 hands but they still look off, I will continue to study the hands until I can comfortably draw them

magic-of-follow-through2.jpg
 

Easy Beginner Sunset Sponge Painting

Friday Fun

Today we get to experiment with sponge painting. It’s easy to do and you don’t need to go buy special art supplies other than the paint. Remember it’s not about a perfect rendering but having fun and trying something different. Let’s get started…

FF-sunset-sponge-painting1.jpg

Supplies:
Painting surface (something to paint on heavy coated paper or cheap canvas)
Paints (cheap acrylic or poster paints) colors: orange, yellow, blue, white and black
kitchen sponge
Q-tips
tape

 
FF-sunset-sponge-painting2.jpg

Prep work:
Tape about 5-7 Q-tips together and set aside we will use these later towards the end of the painting. If you have a big sponge cut it into smaller pieces and you can use different sponges for different colors.


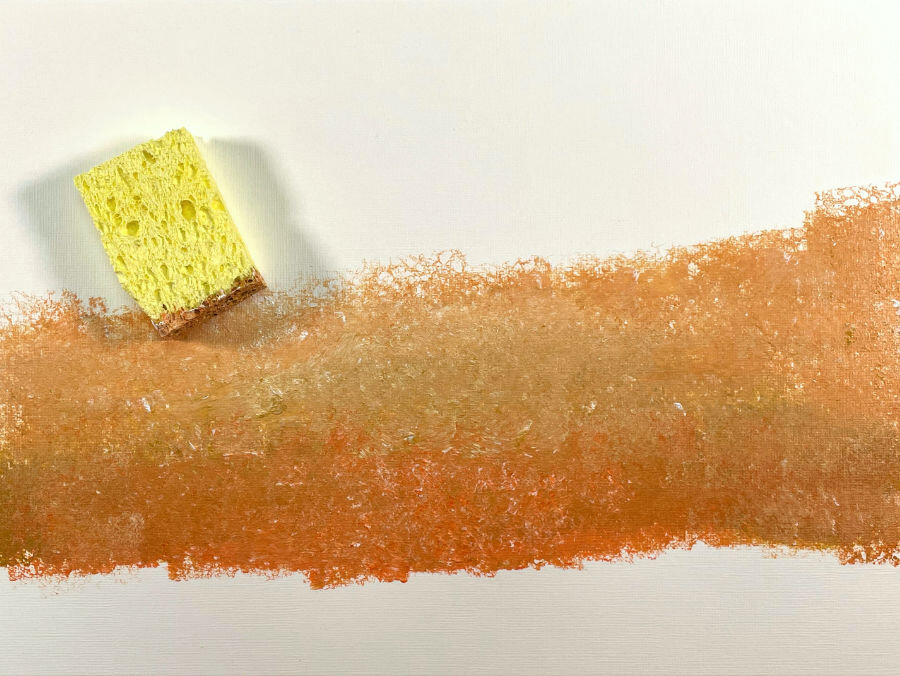
Start in the bottom third of the painting surface. Use white and just a little bit of orange (too much and it will look orange and not light orange) and sponge it in across the lower third of the painting.

FF-sunset-sponge-painting3.jpg

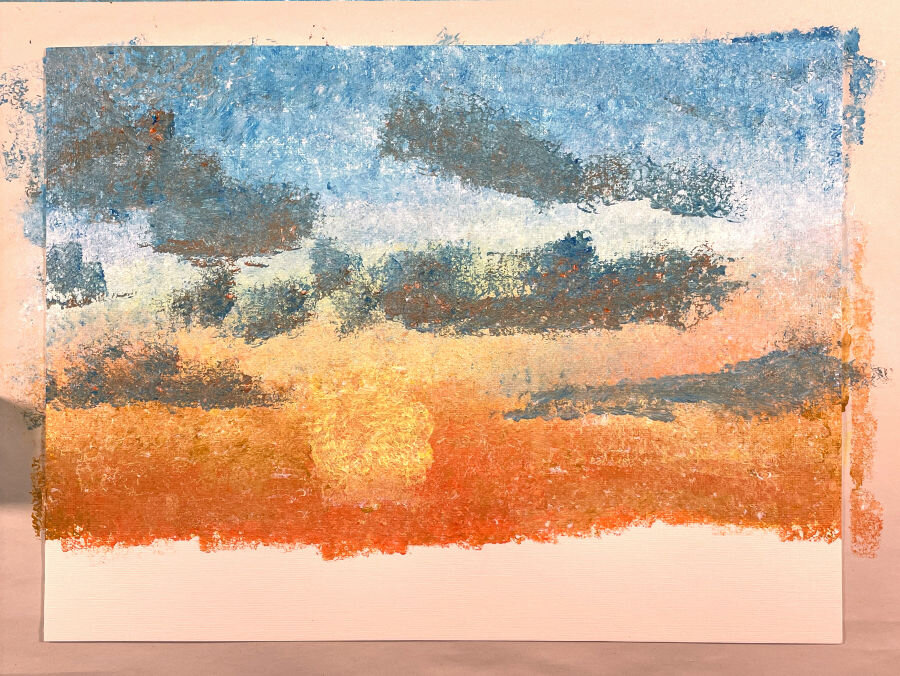
Sponge in yellow (white and just a little bit of yellow) right above the orange area. It’s ok to overlap some, it will even help make it look better.

Sponge in blue (white and just a little bit of blue) at the top of the painting and work your way down towards the yellow area and overlap the colors.

FF-sunset-sponge-painting4.jpg

Use the Q-tips to paint in the sun brighter and then sponge in the clouds (white, little bit of blue and orange)

Finish with black (orange, blue and black) to sponge in the hills and use the Q-tips to paint in the trees. If you have a small paint brush add a few lines for tree trunks and branches.

FF-sunset-sponge-painting5.jpg

Good job! See you next week.


Great Inexpensive Pens for Beginners

Thrifty Thursday

Ink pens can cost a lot and there are so many different types and brands to choose from. If you are just starting out and need to be thrifty and save on art supplies a ballpoint pen works great for drawing. You can buy them by the pack and pick them up from just about anywhere. No need to try and find an art store, just go to your local big box retailer and they will have a variety of pens to choose from. Bic and Papermate are some of the cheapest ball point pens. If you want to be able to vary your line weight while drawing you can look for some brush pens. Tombow, Zebra and Bimoji are good affordable options for a brush pen. Find a pen that works for you and keep drawing.

Inked with a Zebra pen

Inked with a Zebra pen

Pen Basics:

There are different types of pens that you can use for your drawing: felt tip, ball point, gel, dip pen and brush pens to name a few.

Waterproof Ink = ink when dried is resistant to water and will not bleed (smudge) when water is applied.
Non-waterproof Ink = ink that will smudge when water is applied, even if you let it dry for several days.


Shape Basics For Beginners: Draw Through

Tutorial Tuesday

Shape Basics: Draw Through

Draw through objects as you draw. When placing an object behind another don’t just draw the parts the viewer would see, this can cause miss alignment and have a weird effect. Drawing through helps you line up and place the objects you are drawing properly.

Add more details using the shape structure lines as guides to add eyes, nose or other details.

Clean up your structure lines by removing the lines you don’t want to see in the final drawing.

There you go well done!

shape-basics-draw-through.jpg
 

Staying Motivated During Tough Times

Monday Motivation

The hardest thing to do is stay motivated and even harder durning tough times of our lives. Don’t give up there are some things you can do to help you prepare and keep you motivated.

Set up a habit and keep with it. It’s easier to continue a habit than it is a schedule. A schedule is work and a habit is something you just do, out of habit. Start the habit as a small change like drawing for 20 minutes everyday. Build on habits to make bigger changes.

Have a social network. It’s important to have a group to bounce ideas off of and to be social with. Having fun is just as much a part of motivation has challenge is, so have fun with your social network.

Celebrate the small successes. Break up big goals into smaller goals and when you reach that smaller goal celebrate your accomplishment. It will help you realize that you are making progress towards your goal.

Announce what you intend to do. Make announcements about your goals to family, friends, social networks and social media. This holds you accountable and will give you more reason to keep going.

I hope this helps keep your motivation going. Don’t give up!

staying-motivated-milkyway-sky.jpg
 

Paper Owl Fun

Friday Fun

Today we will make a cutout paper owl for Friday fun. Remember to keep it simple and have fun. You can use construction paper if you have it otherwise find some thick paper you can paint with basic acrylic paint.

Supplies Needed:
construction paper (heavy card stock if painting)
scissors
pencil (to draw your owl shapes)
glue (multi-purpose works best)
paint (if not using colored construction paper)


Start with drawing out the shapes you are going to use for the owl. Circles for the eyes, ovals for the head and body, triangle for the beak. You get the idea. There are no wrong ideas you can make your owl look anyway you want it to.

FF-cut-paper-owl.jpg
 

Cut out the shapes of the owl. Don’t start glueing just yet, you want to make sure all the pieces will fit together first. Once all the pieces are cut fit them to together to see if you need to make any changes or cut new pieces.

FF-cut-paper-owl2.jpg
 

Glue the large pieces together and then glue on the smaller pieces. Just like when you draw, large shapes first and work your way down to smaller shapes.

FF-cut-paper-owl3.jpg
 

Wow great job! Enjoy your new paper owl.

 
FF-cut-paper-owl4.jpg

Drawing Shape Basics for Beginners

Tutorial Tuesday

Shape Basics: Large to Small

Look for basic shapes before you begin the drawing. This will help you map out the shapes you are going to use in the drawing.

Start with the largest shapes first when beginning your sketch or drawing. When you start with large shapes and work your way towards smaller shapes this will help with placement and design of the overall drawing. Place the largest shapes and then add the medium shapes and work your way down to the small shapes. Don’t put in any details in yet, you still may need to make adjustments.


Connect all of your shapes and work on the form of your subject. Don’t worry and take your time, you have done most of the work already and this is the fun part. Your drawing is now taking shape.

Keep the details last, they should just be the textures, patterns and small details that will help enhance the final drawing. They should not be the most important part of the drawing. There you go you did it. Congratulations!

Keep practicing and have fun.


It's Never Too Late

Monday Motivation

It’s never too late to change and evolve. We are told find your niche in life and then stay with it, don’t change course. But that is not always true, change is a part of life. Nothing in life is consistently constant. There will always be change and the unknown.

its-never-too-late-caterpillar.jpg
its-never-too-late-butterfly.jpg

Go with it and accept the journey. Don’t be afraid of change think positively of the new journey and it will lead you to success.


Best cheap pencils for beginning artist

Thursday Thrift

Graphite pencils are a great tool if you are just getting started with art, as a student, hobbyist or you just feel like sketching. You don’t have to get a ton of pencils with all the different levels of hardness or get the most expensive brand to get started. Start simple and buy a few different pencils with different levels of hardness and you are all set.

sketched with Ticonderoga number 2 pencil


You can go old school with a Ticonderoga Number 2 pencil like when you were in grade school or get a Bic mechanical pencil, they can be found anywhere no need to go find an art store. The sketch above was all done with a Ticonderoga number 2 pencil, the kind you may have used in grade school.

Grade school pencils


Pencil Basics:

The numbers and letters on the pencils correspond with the hardness of the graphite.

Pencil numbers with an “H” = harder pencils and make lighter lines
Pencil numbers with a “B” = softer pencils and make darker lines


Do This Now for More Success

Monday Motivation

Now is the perfect time to do what ever it is you have been waiting to do. Don’t wait any longer do it now.

Life will always have distractions, set backs and joyous moments. There will never be that perfect moment to start something or get something done. Don’t put it off or wait, start today you will feel a sense of accomplishment just by starting. If you are afraid or it seems impossible or to big of a task, the longer you put it off the more impossible it seems. Starting doesn’t mean you have to finish it today but it puts you on the right track for success.

I put off having a blog and website and thought it would be impossible and I didn’t even know where to start. I finally just followed my own advice and I just started. I did what ever I could do in the beginning and now have a website with a blog. I feel that I have a long way to go but I also feel it is now possible. No more excuses get going and do it now.

I think Nike’s slogan said it best and still holds true today, “Just Do It”.

Don’t wait for life to happen, Just Do It!

Don’t wait for life to happen, Just Do It!


Easy Beginner Pattern Parrot Demo

Friday Fun

It’s Friday so let’s do something different. Today we are going to have fun and not worry about getting perfect form or perfect technique. We are going to draw an outline of a parrot and then paint the inside in geometric shapes the colors of the parrot. Sounds complicated but it’s not and it will be fun trying something different. So let’s get started.


You will need the following supplies:

 
FF-Pattern-Parrot-Supplies.jpg
  • small canvas or acrylic paper

  • paint brush

  • assorted colors of paint

  • pencil & eraser

  • tape (optional)

  • reference of a parrot (It can be your own picture you took or from a royalty free website)


Start with drawing the parrot. You can draw some of the details if that helps you but remember to erase all the details inside leaving only the outline.

I taped parts of the parrot so I could see were to paint the shapes. You can choose to not tape what ever works for you.

FF-Pattern-Parrot-Drawing.jpg
FF-Pattern-Parrot-Drawing2.jpg
 

Select and paint the colors you find in your picture of the parrot. Mix it up and do’t worry about making a pattern with the colors. Just have fun.
I removed the tape (be careful not to rip the paper if using acrylic paper). I then continued painting in different colors until the whole inside of the parrot was covered in paint.

FF-Pattern-Parrot-Painting.jpg
 

I decided to color the background because when I removed my tape it tore the acrylic paper.

All finished, there you have it, now you have a decorative piece of art you can frame and hang. Happy Friday 😊

FF-Pattern-Parrot-Painting-Completed.jpg

We did it!! Come check us out on Facebook.

If Facebook is your thing we are right there with you. I have exciting news. We are proud to announce that we have launched our Facebook business page so you can get all of the up-to-date news about Patrick Boaz Art, tutorials, art tips and discuss art and life all while browsing Facebook. No need to open another app or web browser (it’s now that easy 😊). Come check us out, follow and share with your friends.

~ Thanks for the support

we-did-it-logo.jpg

Keep Going

Monday Motivation

Sometimes it can feel like nothing is going your way and you just want to give up. Don’t stop keep going, it’s ok the tough moments in life will pass. We all struggle with different things at different times in our lives. It’s not necessarily about the end result today but the journey and where it leads you next.

Don’t stop creating your art, keep going. Today you have a hard time with drawing and tomorrow you could have a break through. Maybe after months of painting something clicks for you and your understanding grows. Keep going.

 
tree1.jpg
tree2.jpg
tree3.jpg